
If you love to create music, but don’t want to invest in an expensive instrument like a piano or guitar, then making your own kalimba might be the perfect solution. Kalimbas are percussion instruments that originated in Africa and are played by plucking their steel tines with thumbs while pressing other fingers against them. Making your own kalimba is an easy and exciting DIY project which doesn’t require advanced musical knowledge or carpentry skills – all you need is some basic materials and tools, patience, practice and creativity! In this blog post, we will teach you how to make a wooden-tined diatonic kalimba using simple components such as wood for the body of the instrument and metal tine pieces for sound production.Here is a step-by-step guide on How to Make Your Own Kalimba:
Start by cutting the wooden board to your desired size and shape. You can use a saw or a jigsaw to cut the board into the shape you want
Making your very own kalimba is an enjoyable and creative activity. All you need to get started is a wooden board, saw or jigsaw, and some basic handtools. Begin by cutting the wooden board according to your desired size and shape–the possibilities are endless! You can make a round or rectangular-shaped kalimba with sound holes cutout on top; decorate the box with carvings, shapes, or designs of your choosing for extra personalization. It’s easy to customize your instrument in any way you want before assembling it together into a musical instrument. With the right tools, anyone can make a personalized one-of-a-kind kalimba!
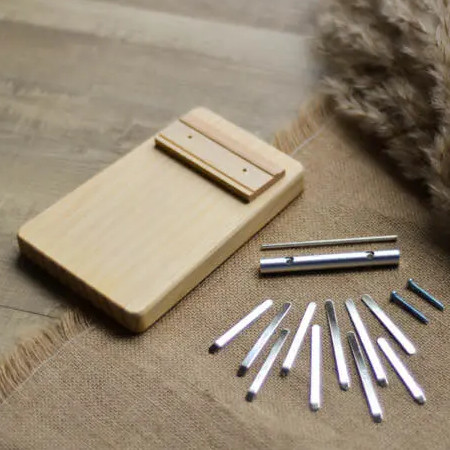
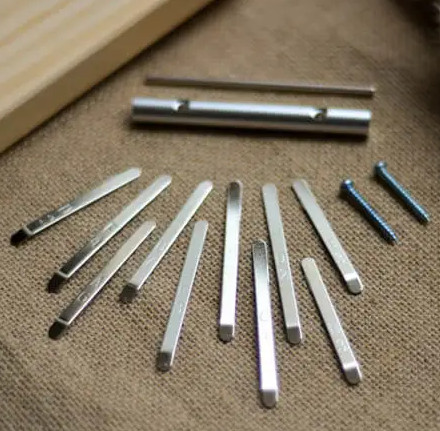
Next, use the hammer and nails to attach the metal keys to the wooden board. The keys should be spaced evenly across the board, with the longer keys towards the bottom and the shorter keys towards the top
Almost anyone can make their own kalimba at home with a few simple materials and tools. Using the hammer and nails, you’ll want to attach the metal keys to the wooden board. Be sure to space the keys evenly–longer on the bottom of the board, shorter towards the top. Once all your notes are in place, tune them to make music. You will have a unique instrument made of your own two hands that you can be proud of!
Once the keys are attached, use the pliers to tune the keys to the desired pitches. This can be done by bending the keys slightly to adjust their length and therefore their pitch
Crafting your own kalimba is an exciting endeavor for any musician who values individual expression and creativity. Once the keys are attached, it’s time to make your instrument come to life by tuning the keys so that they make different pitches. With some pliers and a keen ear, you can make tiny adjustments to the keys to bend their length – and consequently adjust their pitch. The beauty of creating your own handmade music lies in the fact that there’s no right or wrong way to tune each key – it all comes down to what sounds best to you as the artist.
Finally, test the kalimba by plucking the keys and listening to the pitches. Adjust the keys as needed until you are happy with the sound
Once you have made your own kalimba, it’s time to make some music. Start by plucking each key and listening to the pitch as it resonates throughout the room. If you find that it doesn’t quite sound like what you had in mind, make small adjustments until the sound is more pleasing to your ears, and make sure that all the keys are level with each other – any slight difference can make a big difference! With patience and practice, you’ll be creating beautiful melodies with your homemade kalimba in no time.
Once you have made your kalimba, you can decorate it with paint, stickers, or other embellishments. You can also experiment with different materials and sizes to create a unique instrument that suits your personal style
Making your own kalimba from scratch with nothing but materials and a few tools can be incredibly rewarding. Not only do you get to make an instrument that is truly yours, but you also have plenty of opportunities to make it unique. You can personalize it by adding colorful coats of paint, or by adorning it with clashing stickers, ribbons, rhinestones, and other sorts of embellishments. Different sizes of the kalimba can also produce different sounds; experiment with a wide range and make your very own musical masterpiece.
Keep your own kalimba in tune
Keeping your own kalimba in tune can be a fun and rewarding experience. If you make your own, it will be even more so! Nothing beats the satisfaction of having crafted your own instrument and made it capable of producing beautiful music. Tuning it will help make sure that every note is at its best quality to create a great sound for you to enjoy. With a few simple tweaks and some patience, you’ll have no trouble making sure your kalimba is always sounding perfect!
Conclusion
Building your own kalimba is a great way to get started making music without having to invest in an expensive instrument. With just a few simple materials and some patience, you can create a beautiful and unique musical instrument that you’ll be able to enjoy for years to come. Thanks for following along with us – we hope you enjoyed learning how to make your very own kalimba! Now that you have your kalimba, it’s time to make some music!
Making your own kalimba is a wonderful and fulfilling experience- not only does it give you the satisfaction of creating something with your own two hands, but it also allows you to express your musical creativity. Whether it’s a gift to someone special or just something that you made for yourself, your kalimba will be treasured as a unique and personal masterpiece. So go ahead and make your own musical magic! We wish you the best of luck in creating a one of a kind kalimba that you’ll love to play.